
We have a lot of data, photos and videos mostly. I’ve got 60,000 images from my DSLRs, mostly RAW, going back to about 2006 and taking up around 1.4 TB of space. Outside of that we have all of our regular photos and videos from our phones and old-school digital cameras. That adds 62,000 more photos and videos and another 818 GB. We’ve also got our regular documents on our laptops and I have another 1.2 TB of archived Mac software. All together we have over 3 TB of important stuff that needs to be protected in case something bad happens like a hardware failure, fire, flood, or even a theft.
To protect this data, we use a multi-level backup strategy that includes both local and cloud backups. The local backups protect us from immediate hardware failures or loss of our laptops or phones. They also provide recovery speed – restoring from a hard drive is far faster than downloading from the internet. We’ve had local backups for nearly 15 years in the form of Apple Time Machine and RAID drives. A few years ago we added cloud storage to the mix to protect against a catastrophic loss of our local backups due to physical damage in our house (fire, flood, storm, theft). Last year we switched providers and finished uploading all of our data.
The image below depicts our setup broken down into three groupings.
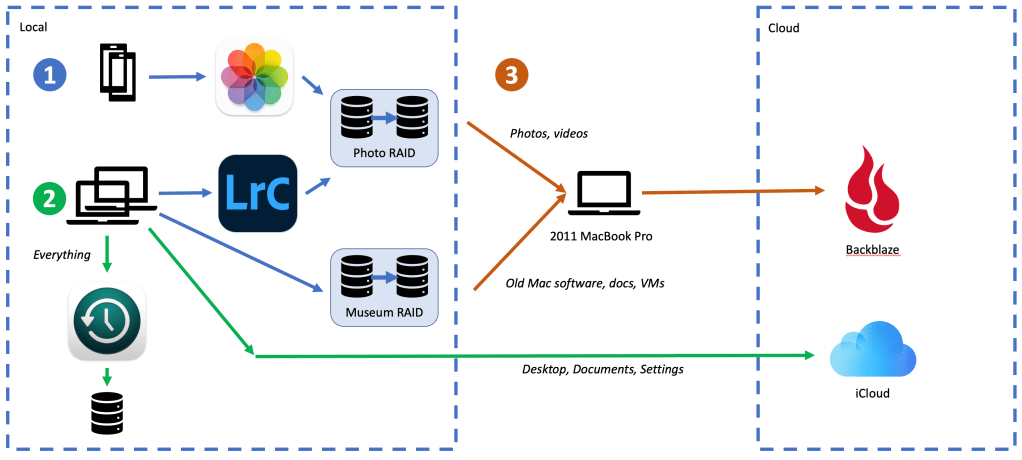
The first section depicts the workflow for our phones. Every few months we import any images and videos on our phones into Photos libraries stored on a RAID. The RAID is configured with two 4 TB hard drives that duplicate each other. If one fails, we replace it, and the enclosure automatically copies the contents of the first drive to the new one. This keeps space free on our phones and keeps us insulated from hardware failures in our backups. This image doesn’t depict regular phone backups to iCloud, but those happen too and ensure our latest photos are backed up before they hit the RAID.
Section two covers our laptops. I store my Lightroom library and Smart Previews on my MacBook Pro but keep all of the full-size images and RAW files on the same RAID that stores photos from our phones. I regularly grab old Mac software and store my virtual machines on a separate RAID that acts as an archive for My Mac Museum. We backup both of our laptops to an external hard drive through Time Machine. Since our Time Machine backup isn’t compatible with our cloud backup solution, we also backup our desktop, Documents folder, and settings to iCloud.
While our two RAIDs provide hardware redundancy in case of failure, they don’t protect us from physical damage. To address this, we back them up to the cloud as well. We’ve chosen Backblaze because it’s inexpensive and works really well. We pay $7 per month for unlimited storage. In case of an issue, we can download our content from the cloud or request a hard drive containing up to 8 TB of our data. The drives need to be backed up through a client that runs on a Mac, so we use an old 2011 MacBook Pro (my Virtual Mac Museum) for the backups so that our own machines aren’t tied up in cloud backups all day.
The initial backup of our two RAIDs to Backblaze took about 2 weeks of all-day uploads, but now that we have the baseline, most uploads take less than a day. Prior to Backblaze we used Google Drive, but it was more expensive, the backup client didn’t work well, and I never dedicated time to backing up my RAW files. Our switch to Backblaze this summer was a positive experience and now all of our stuff is safe. If you’re interested in trying it out, you can use my code to get a month free.
While it has a lot of moving parts, our backup strategy is working very well. We have local backups to ensure our latest data is safe and can be restored quickly. We use cloud backups to ensure that none of our historical data is lost in case of a hardware failure or physical event. After many years of knowing we had gaps, I finally feel like our data is well-protected.

3 Replies to “Our Backup Strategy”